What you’ll need:
- Mug Press
- Flexible finishing sheet
- Heat tape
- Baseball
- Pre-made transfer using EZ Peel Paper (pre-married and pre-cut)
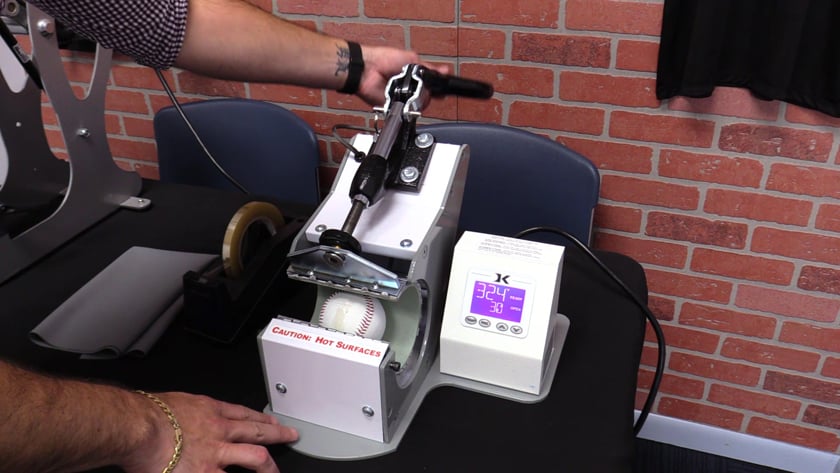
- Pre-heat your mug press to 320°F and set the timer for 30 seconds. Check the pressure to make sure you are at a medium. Pro Tip: insert the baseball into the mug press prior to taping the transfer onto the baseball and check the pressure to make sure it is correct.
- Using the heat tape, fully tape the transfer to the baseball in the desired position. Ensure the entire transfer is covered with heat tape to make sure the transfer is totally flat on the baseball.
- Carefully place the baseball into the mug press and close the press for 30 seconds.
- When the time has elapsed, carefully remove the baseball from the mug press and allow to completely cool. Pro Tip: place a cold pack on top of the transfer to cool it down quicker or place the baseball in the freezer to ensure the transfer is completely cooled down.
- Once the transfer has completely cooled down, begin to remove the heat tape as well as the A sheet in a slow and steady motion. Pro Tip: If you are finding a portion of the graphic has not fully adhered to the baseball as you are peeling the A paper away, simply put it back in the mug press for another 15-20 seconds. Let it completely cool down again before beginning to peel.
- Once the A paper has been removed, wrap the baseball in the flexible finishing sheet and carefully place it back into the mug press to complete the finishing step. Press the baseball for 20 seconds.
- When the time has elapsed, carefully remove the baseball from the mug press and remove the flexible finishing sheet to reveal your finished product.


